Installation and Configuration guide
Installation
To be able to deploy RunAsService, you need to have the MS.Net
framework version 1.1 installed.
If you do not have this, you can download a copy at
MSDN
Installation is very easy, its just a matter of extracting the zip file into the desired location and running the Install.cmd file.
The Install.cmd batch file requires only 1 parameter, the account type the service uses to run. This can be one of the following:
- user
An account defined by a specific user on the network. Specifying User causes the system to prompt for a valid user name and password when the service is installed. - localsystem
An account that has a high privileged level. - localservice (only on WinXP and later)
An account that acts as a non-privileged user on the local computer, and presents anonymous credentials to any remote server. - networkservice (only on WinXP and later)
An account that provides extensive local privileges, and presents the computer's credentials to any remote server.
For instance to install RunAsService using a specific
user account, type at the command prompt:
Install user
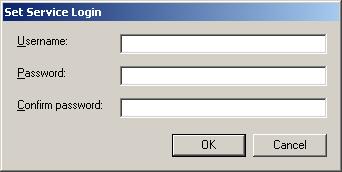
The following dialog is shown:

After entering a correct username and associated password the installation finishes.
Configuring RunAsService
RunAsService is configured using the MS.Net application configuration file.
This file, which you can find in teh installation directory, is named
RunAsService.exe.config.
The application configuration file is structured using XML format, and consists of 3 section:
-
<configSections>
Defines the next custom configuration sections. -
<log4net>
Configures the log4net logging functionality. For more information about configuring log4net, please look at the log4net site at http://logging.apache.org/log4net -
<service.settings>
This is the most interesting section, it configures each application to be run as service.
Generally the <service.settings> section looks like this:
	<service.settings>
		<!-- Run application 1 as service -->
		<service>
			<name>Application 1</name>
			<executable>C:\Path-To\application-1.exe</executable>
			<parameters>Parameters for application 1</parameters>
		</service>
		...
		<!-- Run application n as service -->
		<service>
			<name>Application n</name>
			<executable>C:\Path-To\application-n.exe</executable>
			<parameters>Parameters for application n</parameters>
		</service>
	</service.settings>
For every application that you want to run as a service, add a
<service>.
The optional value of the <name> element
is arbitrary, you can add anything you like to describe the application.
More important is the <executable> element.
This needs to be the full path to the executable and is mandatory.
The <parameters> element is optinal, you can add any parameters
that you would normally add to the commandline when starting the application.
Following is a sample configuration that contains 2 applications. The SubVersion server component, the application that started all this, and a java application.
	<!-- Run Subversion server as service -->
	<service>
		<name>SubVersion Server</name>
		<executable>C:\Program Files\Subversion\bin\svnserve.exe</executable>
		<parameters>-d -r c:\bin\svn\repository</parameters>
	</service>
	<!-- Run a java program as service -->
	<service>
		<name>Java Test Service</name>
		<executable>C:\j2sdk1.4.2_04\bin\java.exe</executable>
		<parameters>-cp c:\Java\test Test</parameters>
	</service>
Now that the configuration has completed, all that is left is starting the service.
To accomplish this, you'll need to open the control panel's services applet.
Select RunAsService in the list and click the start button.
Check the log4net logfile to see if any failure occured.
You can also check the Eventlog for errors, if the service could not be started.